This pattern is OSFM and gauge is unimportant. It can be easily adjusted larger or smaller depending on the size of the hand and how far up the arm you want the mitt to go. I have a fairly large hand so adjust as you like. They're ambidextrous-you can wear them on either hand.
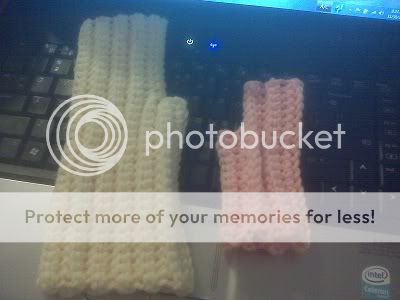
As you can see from the photo, they're easily sized for adults or children. I made both mitts with the same weight of yarn and the same hook just to show you. Also, my granddaughter and grandson want a pair so she'll get the peach pair and I'll do him some in another color ;)
Materials:
WW yarn such as RHSS-about three ounces should be sufficient for mitts as written.
Crochet hook size J
For slim hands use a size I hook and follow pattern
For very wide hands use a size K hook and follow pattern
For children you can use sportweight yarn and a size H hook
With a size I hook and a starting ch of 26 I got two pairs of mitts out of one 5 oz skein of varigated RHSS and only had a little bit left over. I believe you could do the same with the J or K hooks
Note. This mitt is easily adjustable since it is sl st together when finished. If you need it longer, just add more sts to thumb gusset. If you want it to cover more of your fingers just add more sts at the end of Row 6 (or 8). If you need the thumb gusset larger, add two more rows (making it 8 rows) before ch for the hand. If you want to cover more of your thumb, attach yarn to thumb gusset after joining mitt and work 3 or 4 rnds of sc around the opening.
Note, when adjusting for size, always keep your row count even instead of odd, this makes the joining less-visible.
Note: For a slightly longer mitt (about halfway between wrist/elbow), ch 26 for a starting ch (you will have 25 sts in your thumb gusset) and follow other directions as written.
Skill level: Advanced beginner/intermediate
Mitts: Make 2.
Thumb gusset:
Ch 21. Sc in 2nd ch from hook and in each ch across. 20 sc.
You will now be working in the BLO throughout unless otherwise specified.
Rows 2-6: Ch 1, turn. Working in the BLO, sc across. At the end of Row 6, ch 13 for hand.
Row 7: Sc in 2nd ch from hook and each ch across, sc in BLO of next 20 sc. 32 sc.
Rows 8-24: Rep Row 2. Do not fasten off.
Joining (Note: Keep your tension a bit loose for this): Turn work. You will now join piece together using sl st. Insert hook under both lps of first sc and in the first free lp of ch-12 opposite, YO and complete sl st. Continue this way for the next 11 sts. Next continue on down the side of the mitt using the free lps of beg ch-20 (This will leave an opening for your thumb). Continue in sl st until you reach the wrist, then end off and hide the two loose ends to the inside of mitt.
Note: You will be joining mitt on the right side, so do not turn mitt inside-out when done. The joining is harder to see this way (It resembles the ribbing).
Note: Before cutting yarn after joining, try the mitt on. If it's too tight, rip back and add a couple more rows (1 rib). Continue doing this until the mitt fits hand comfortably. While you do want some stretch, you don't want so much that it's too tight. It may look small when you first put it together according to the above instructions, but it will stretch, which is why I recommend trying it on before cutting yarn.
Abbreviations used:
Ch: Chain
Sl st: Slip stitch
Beg: Beginning
Sc: Single crochet
BLO: Back Loop Only
St(s): Stitch(es)
Rnd(s): Round(s)