Notice

All of these patterns belong to me. They are here for your personal use, but please do not post them to other websites. Instead, link back to them.

Notice

If you make any of these items to sell, you cannot claim the design as your own. You can claim that you handmade the item, but you must credit me, Julie Hicks, as the designer.
Showing posts with label crochet. Show all posts

Wednesday, November 30, 2011

Ribbed Fingerless Mitts

I found this pattern on the net quite a few years ago, but it looks like it isn't there anymore and I can't remember who wrote it, but it's such a simple pattern that I'm going to put it here. The OP used sock weight yarn and a size G or H hook, but I like thicker ones, so I'm writing it for WW yarn. She also stitched them together with a yarn needle and I prefer to crochet them together.

This pattern is OSFM and gauge is unimportant. It can be easily adjusted larger or smaller depending on the size of the hand and how far up the arm you want the mitt to go. I have a fairly large hand so adjust as you like. They're ambidextrous-you can wear them on either hand.
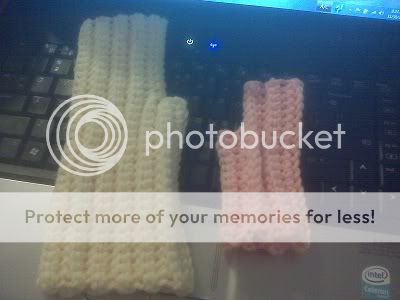


As you can see from the photo, they're easily sized for adults or children. I made both mitts with the same weight of yarn and the same hook just to show you. Also, my granddaughter and grandson want a pair so she'll get the peach pair and I'll do him some in another color ;)


Materials:

WW yarn such as RHSS-about three ounces should be sufficient for mitts as written.
Crochet hook size J
For slim hands use a size I hook and follow pattern
For very wide hands use a size K hook and follow pattern
For children you can use sportweight yarn and a size H hook

With a size I hook and a starting ch of 26 I got two pairs of mitts out of one 5 oz skein of varigated RHSS and only had a little bit left over. I believe you could do the same with the J or K hooks

Note. This mitt is easily adjustable since it is sl st together when finished. If you need it longer, just add more sts to thumb gusset. If you want it to cover more of your fingers just add more sts at the end of Row 6 (or 8). If you need the thumb gusset larger, add two more rows (making it 8 rows) before ch for the hand. If you want to cover more of your thumb, attach yarn to thumb gusset after joining mitt and work 3 or 4 rnds of sc around the opening.

Note, when adjusting for size, always keep your row count even instead of odd, this makes the joining less-visible.

Note: For a slightly longer mitt (about halfway between wrist/elbow), ch 26 for a starting ch (you will have 25 sts in your thumb gusset) and follow other directions as written.

Skill level: Advanced beginner/intermediate

Mitts: Make 2.

Thumb gusset:

Ch 21. Sc in 2nd ch from hook and in each ch across. 20 sc.

You will now be working in the BLO throughout unless otherwise specified.

Rows 2-6: Ch 1, turn. Working in the BLO, sc across. At the end of Row 6, ch 13 for hand.

Row 7: Sc in 2nd ch from hook and each ch across, sc in BLO of next 20 sc. 32 sc.

Rows 8-24: Rep Row 2. Do not fasten off.

Joining (Note: Keep your tension a bit loose for this): Turn work. You will now join piece together using sl st. Insert hook under both lps of first sc and in the first free lp of ch-12 opposite, YO and complete sl st. Continue this way for the next 11 sts. Next continue on down the side of the mitt using the free lps of beg ch-20 (This will leave an opening for your thumb). Continue in sl st until you reach the wrist, then end off and hide the two loose ends to the inside of mitt.

Note: You will be joining mitt on the right side, so do not turn mitt inside-out when done. The joining is harder to see this way (It resembles the ribbing).

Note: Before cutting yarn after joining, try the mitt on. If it's too tight, rip back and add a couple more rows (1 rib). Continue doing this until the mitt fits hand comfortably. While you do want some stretch, you don't want so much that it's too tight. It may look small when you first put it together according to the above instructions, but it will stretch, which is why I recommend trying it on before cutting yarn.

Abbreviations used:

Ch: Chain
Sl st: Slip stitch
Beg: Beginning
Sc: Single crochet
BLO: Back Loop Only
St(s): Stitch(es)
Rnd(s): Round(s)

Friday, December 31, 2010

Cushy warm booties

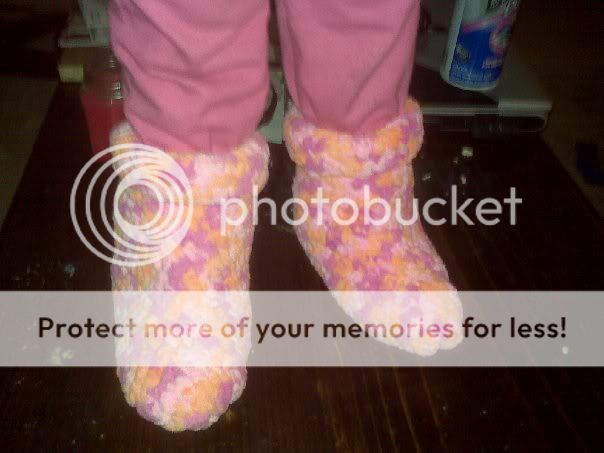
I sat and did these in a day's time (though I was distracted by three grandkids). They're very warm and cushy.
My granddaughter Kadi insisted on modeling them, although they're way to big for her.


Materials:

Bernat Baby Blanket, 2 balls, any color.
Crochet hook size K

Gauge: 4 sc= 1"

Note: I have no idea how to write for different sizes, but the way this pattern is written, it should be easily adjusted up or down for larger or smaller feet. I wear a size 8-1/2W shoe, so the pattern as written will fit a fairly large foot. If adjusted up or down, keep the number of stitches worked at an even number.

Note: You decide which side looks best, and that will be your right side. When you go to crochet bootie together, you will need to fold it so the right side is to the inside, then turn it right side out when finished,

Yarn substitutions: Since this is a very thick velour yarn, any comparably thick velour yarn should do nicely. You may also try holding several strands of WW yarn together, at least three strands. I may try that just to see and let you know. The yarn weight for Bernat Baby Blanket is 6, so use that as a guide. I made several pairs in Lion Brand Thick and Quick, so that works. For men, I'd use a size L (8mm) hook and only make 6 rows for cuff, leaving enough yarn to stitch with a large-eye needle. One ball will make one bootie this way.

Instructions:

Note: Ch 1 to turn all rows.

Dec: Insert hook in next st, YO and pull up a lp, insert hook in next st, YO and pull up a lp, YO and pull through all three lps on hook.

Sole:

Ch 55

Sc in 2nd ch from hook and each ch across. 54 sc.

Next three rows: Sc in each sc across.

Shape instep:

Sc in first 22 sc, work a dec over next 2 sc, rep dec over next 2 sc, sc in next 2 sc, dec over next 2 sc, rep dec over next 2 sc, sc in last 22 sc. 50 sc.

Sc in first 20 sc, work a dec over next 2 sc, rep dec over next 2 sc, sc in next 2 sc, work a dec over next 2 sc, rep dec over next 2 sc, sc in last 20 sc. 46 sc.

Sc in first 18 sc, work a dec over next 2 sc, rep dec over next 2 sc, sc in next 2 sc, work a dec over next 2 sc, rep dec over next 2 sc, sc in last 18 sc. 42 sc

Sc in first 18 sc, work a dec over next 2 sc, sc in next 2 sc, work a dec over next 2 sc, sc in last 18 sc. 40 sc.

Sc in first 17 sc, work a dec over next 2  sc, sc in next 2 sc, work a dec over next 2 sc, sc in last 17 sc. 38 sc

Sc in first 16 sc, work a dec over next 2 sc, sc in next 2 sc, work a dec over next 2 sc, sc in last 16 sc. 36 sc

Sc in first 15 sc, work a dec over next 2 sc, sc in next 2 sc, work a dec over next 2 sc, sc in last 15 sc. 34 sc

Sc in first 14 sc, work a dec over next 2 sc, sc in next 2 sc, work a dec over next 2 sc, sc in last 14 sc. 32 sc

Sc in first 13 sc, work a dec over next 2 sc, sc in next 2 sc, work a dec over next 2 sc, sc in last 13 sc. 30 sc

Cuff:

Work 10 rows of sc. Do not cut yarn.

Finishing:

Fold bootie in half, right sides together. Crocheting through both thicknesses, slst bootie together down the back seam and across bottom. Cut yarn and weave in ends.

Tip: Try to catch only one strand of yarn when crocheting bootie together to minimize the thickness of the seam.

Tip: It's really aggravating when you're crocheting the back seam together, if you find it too frustrating, try using a smaller hook to pull up a strand, then stick your working hook into it. Once you get to the bottom, it's much easier to crochet through the unused loops of the beginning chain.

Abbreviations:

ch: Chain
sc: Single crochet
dec: decrease
rep: repeat
YO: yarn over
lp/lps: loop/loops
slst: slip stitch.

Tuesday, June 23, 2009

Capelet

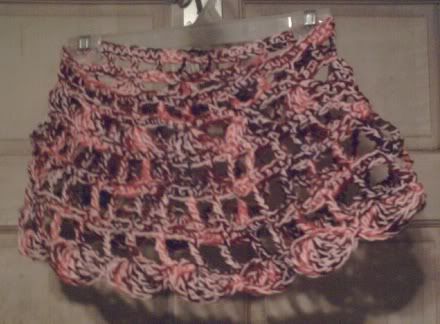
All right, here's my capelet:


Materials:

6 ozs WW yarn in two colors, or use two skeins of the same color.
Crochet hook size N

Gauge: Unimportant-OSFM

Note: Capelet is made holding two strands of yarn throughout.

I used Red Heart Super Saver in a solid pink and fiesta varigated, I think, they were partial skeins. 1 six oz skein of each color should be plenty to make the capelet.

Ch 72, join with sl st in first ch to form circle, being careful not to twist sts.

Rnd 1: Ch 1, sc in each ch around, join with sl st to first sc. 72 sc.

Rnd 2: Ch 5 (Counts as beg dc + ch-2), sk 2 sc, *dc in next sc, ch 2, sk 2 sc. Rep from * around, join with sl st in 3rd ch of beg ch-5. 24 dc and 24 ch-2 sps.

Rnds 3, 5, 7 & 9: Ch 1, sc in each st and ch around.

Rnd 4: Ch 5 (Counts as first dtr), 5 dtr in same sp, sk 5 sc, *6 dtr in next sc, sk 5 sc. Rep from * around, join with sl st in top of beg ch-5. 12 dtr groups

Rnd 6: Ch 7 (Counts as first tr and ch-3), sk next sc, *tr in next sc, ch 3, sk next sc. Rep from * around, end with sl st in 4th ch of beg ch-8.

Rnds 8 & 10: Ch 8 (Counts as first dtr and ch-3), sk next 3 sc, *dtr in next sc, sk next 3 sc. Rep from * around, end with sl st in 5th ch of beg ch-8

Rnd 11: Ch 5 (Counts as first dtr), 5 dtr in same sp, sc in next dtr, *6 dtr in next dtr, sc in next dtr. Rep from * around, end with sl st in top of beg ch-5. Break off and fasten.

Weave in all loose ends.

Abbreviations

Ch: Chain
SP: Space
St(s): Stitch(es)
Sk: Skip
Sl St: Slip Stitch
SC: Single Crochet
DC: Double Crochet
TR: Treble
DTR: Double Treble